DWUser.com
Empowering Web Creativity
Support Center - EasyRotator for WordPress
EasyRotator KnowledgeBase – Using Iframes with EasyRotator
When using EasyRotator for Dreamweaver / Standalone (not EasyRotator for WordPress), there are several situations where the use of iframes can prove helpful:
- You want to display the same rotator in many pages. By following the directions below, you can update a single rotator in the central holder page; the updated rotator will instantly be displayed in all of the other pages, without any code updates needed in those other pages. This is especially helpful when working with Dreamweaver templates.
- You want to isolate rotators from their parent pages. Perhaps you have coding issues in your main page, and you received an EasyRotator warning telling you that you needed to add a DocType definition to your page. When you added the required doctype, it broke your page. While the long-term solution is to fix the errors in the main page and make it standards compliant, you can buy yourself time by placing the rotator in a separate page and displaying that holder page in your main page via an
<iframe>. - You want to integrate EasyRotator in a CMS environment other than WordPress. While EasyRotator for WordPress is available for WordPress users, we don't currently offer modules for Drupal, Joomla or other less-common CMS platforms. Fortunately, you can use iframes to allow the integration of EasyRotator rotators into these alternate platforms.
Tip: Are iframes and/or how they work new to you? Read our introductory article, The Magical <iframe> Tag: An Introduction, to get up to speed.
How-To Guide
1. To begin, you need to create a new separate holder area in your site for rotator content. We recommend that you create a rotators/ folder in the top folder of your site, so that when uploaded it appears at http://www.yourdomain.com/rotators/ . Put your images within that folder, e.g. in rotators/images/.
2. Create a new HTML page in that folder. This page will be a holder page for a rotator, so name it e.g. rotator_holder1.html . Use the following starter HTML as the contents in the new page:
<!DOCTYPE HTML>
<html>
<head>
<meta http-equiv="Content-Type" content="text/html; charset=UTF-8">
<title>Rotator Holder</title>
<style type="text/css">body, html { padding: 0; margin: 0; }</style>
</head>

<body>

<!-- ADD ROTATOR CODE IMMEDIATELY BELOW THIS LINE -->

</body>
</html>
3. This step varies based on your situation:
If you're moving an existing rotator: Switch back to your main page and identify the EasyRotator code block. It is identified by:
<!-- Begin DWUser_EasyRotator -->
...
...
...
<!-- End DWUser_EasyRotator -->
Cut this code block from the main page and paste it into the rotator_holder1.html page where indicated.
Check to make sure that all of the image paths are still correct; they may need to be updated to properly reflect the new relative location(s) of the image files.
If you're creating a new rotator: Simply create a new rotator and insert it into the new rotator_holder1.html page where indicated.
4. Upload the rotator_holder1.html page and make sure that you can properly view the rotator at http://www.yourdomain.com/rotators/rotator_holder1.html . Once you're able to view the rotator by itself in this page, you're ready to continue.
5. Now, paste the following code wherever you want the rotator to appear:
<iframe src="http://www.yourdomain.com/rotators/rotator_holder1.html" width="400" height="300" scrolling="no" frameborder="0"></iframe>
Update the highlighted values to reflect the actual location and dimensions of your rotator. You can put this code in a Dreamweaver template file, in a standard HTML page, or in the post/page editor for your CMS (e.g. Joomla). Wherever you place it, the rotator will be displayed. Any changes made to the rotator in the holder page will instantly be reflected in all of the locations where this iframe code is used.
For Additional Rotators
Repeat steps 2-5 for each additional rotator you wish to move or create.
Handling Links in Rotators Displayed via Iframes
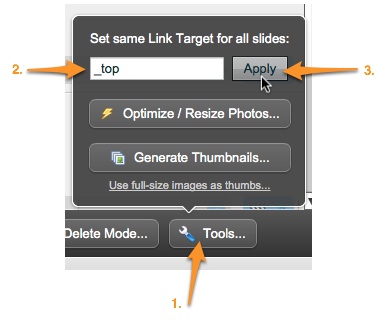
If you have applied links to the photos in your rotator(s), you may need to make a small change to ensure that the links open in the proper window. If your links are configured to open in a new window (a target of _blank), then no change is needed. However, if the links are supposed to open in the same window, you need to use the Tools menu to set the link target for all photos to _top :
We're Here to Help!
If you have any questions about this article or using EasyRotator, please let us know by opening a support ticket below.