DWUser.com
Empowering Web Creativity
Support Center - EasyRotator
On-Demand Support Options
To get started and use EasyRotator for WordPress:
Resources to get started and use the Dreamweaver / Standalone version:
KnowledgeBase / Common issues:
- Common EasyRotator Editor Application Errors
- Common Installation Problems
- WordPress Code Corruption Error Message
- Adding Sliders to Your Theme's Header / Homepage: WordPress Template Function
- Changing Fonts, Colors and Arrow Images: Making Layout Customizations
- Avoiding Photo Cropping: Setting the Image Scaling Mode
- Making Rotators Responsive
- Setting Rotator Alignment
- Duplicating a Rotator
- Video FAQs
- Permissions Error #3013
- Images Don't Appear in Rotator
- Using EasyRotator on an SSL Site
Existing Users: EasyRotator launching but window not appearing? Details and easy fix
The AIR 3.0 update that was released by Adobe in late 2011 causes problems with some system configurations. The most common symptom is for the EasyRotator wizard application to suddenly stop appearing when being launched. Fortunately, there's a simple fix:
- Restart your system
- Install the very latest version of Adobe AIR
- Download the latest EasyRotator ZIP file from the EasyRotator homepage
- Extract the EasyRotator ZIP file and run the included EasyRotator-Win.exe installer (Windows) or EasyRotator-Mac.dmg installer (Mac)
- Launch EasyRotator as before. If you receive a warning in Dreamweaver about the wizard already running, ignore it and choose the Continue option.
If you continue having trouble after installing the updated wizard, please open a support ticket at the bottom of this page.
Quickstart Installation Instructions
When you download the EasyRotator_buildVVV.zip file (where vvv is the build number), unzip the contents to an easy-to-find location. The first step is to install the wizard program. This step is slightly different for Mac and Windows:
- Windows - To run the installer, double-click the EasyRotator-windows.exe application in the download package. Be patient; it may take a moment to launch. It will install any necessary prerequisites along with the wizard program. Leave the default settings for any installation options unless you're an advanced user and you fully understand them.
- Mac - Double-click the EasyRotator-Mac.dmg disk image file in the download package to open it. You will see one item inside: an installer labeled Install EasyRotator. Double-click this file to run the installer. Be patient; it may take a moment to launch. It will install any necessary prerequisites along with the wizard program. Leave the default settings for any installation options unless you're an advanced user and you fully understand them.
The next step is optional. If you have Dreamweaver, you can use the included Dreamweaver extension for easier access to EasyRotator for creating and managing rotators. To install the extension, first launch the Extension Manager by selecting Help > Manage Extensions in Dreamweaver. (If you have an older version of Dreamweaver that doesn't have this option, launch the Macromedia Extension Manager directly from your Applications/Programs menu. Then, in the Extension Manager, select your version of Dreamweaver from the Products menu.) Click the Install button, browse to the EasyRotator_DW_ext.mxp file from the download package, then click OK and allow the installation to complete. Restart Dreamweaver, and the extension will be ready to use.
Quickstart Usage Instructions
The preparation for creating a rotator differs slightly, depending on whether you're using the Dreamweaver Extension or not:
- Preparation for Dreamweaver Extension - You must have an existing HTML page that will hold the new rotator. (You can create a new page if needed.) Additionally, you must have already created a Dreamweaver Site Definition and saved your page within the site's root folder. Finally, you must have placed all of the image files you plan to use in the rotator within the site's root folder.
- Preparation for Standalone version - You must have an existing HTML page that will hold the new rotator. (You can create a new page if needed.) Additionally, you must have a single folder that holds all of the files for your site, including the HTML page and the image files you'll use in the rotator. This folder is referred to as the Site Root Folder. If you're not sure what this folder should be, just assume that it's the folder holding the HTML page; in this case, place all of your image files in this folder as well, e.g. with an rotator_images/ sub-folder for organization.
There are two ways to access the EasyRotator wizard to create a rotator, depending on whether you're using the Dreamweaver Extension or not:
- Accessing the Dreamweaver Extension - Place the cursor at the location in your page where you want the rotator added. Select Insert > DWUser > EasyRotator to launch the wizard. The Dreamweaver communication dialog will appear momentarily:
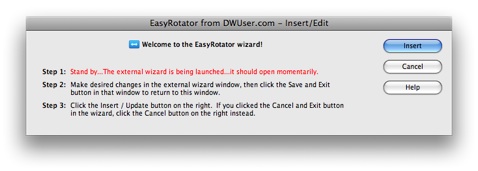
The EasyRotator wizard will automatically be launched and appear after a moment. - Accessing the Standalone version - You will launch the EasyRotator program directly from your Programs or Applications menu. When you first launch, you'll have to specify the HTML page and site root folder that you're working with. You'll use the values you determined when preparing to insert, as discussed above.
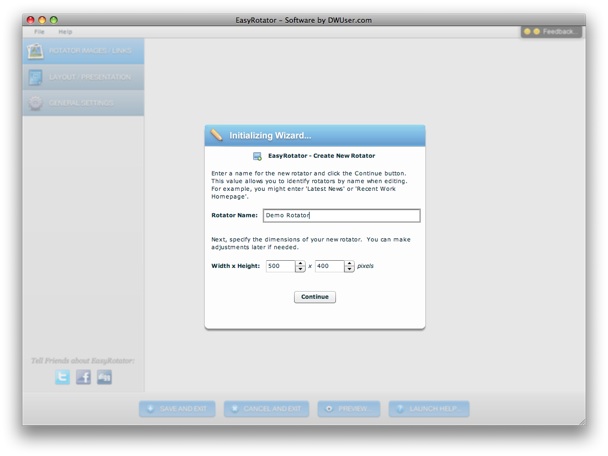
Now that you're in the EasyRotator wizard, you'll be asked to name the new rotator and specify its dimensions. Naming the rotator allows you to identify it more easily later when editing.
You'll now enter into the main wizard view:
Here's an overview of the interface:
- On the left side are the main navigation buttons. The buttons provide access to the three main sections of the wizard - the Images/Links section, the Layout/Presentation section, and the General Settings section.
- Along the bottom are the main program buttons:
- Save and Exit - This is the button you'll use to exit once you're done creating or editing a rotator and ready to exit the wizard.
- Cancel and Exit - If you change your mind about creating or editing a rotator, you can cancel and none of your changes will be preserved.
- Preview - As you're making changes and creating or editing a rotator, this button allows you to preview your work with a single click.
- Launch Help - Provides a shortcut to this help page.
- The Feedback button on the top right allows you to instantly send feedback about EasyRotator from within the program.
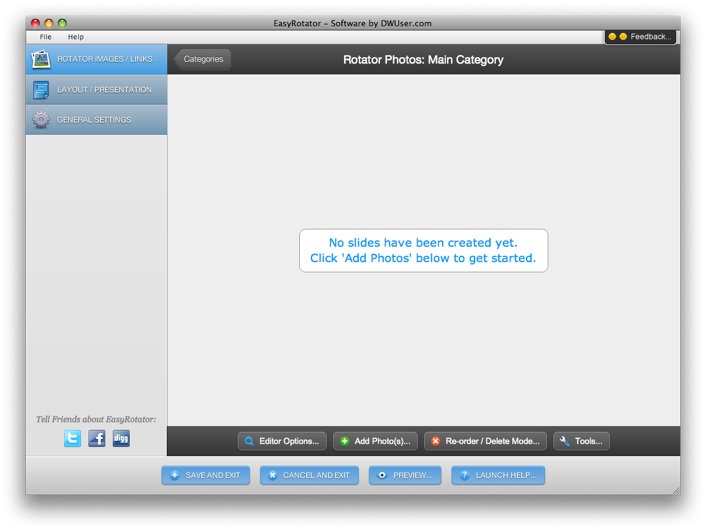
The Images/Links Section is where you'll specify the photos and links to use in the rotator:
Most layout templates are designed to have only one image category. But for other templates, there may be support for multiple categories. The Categories button in the top-left gives access to the category management view. You'll spend most of your time, though, in the image management view where you edit the photos in a single category (the view pictured above). To create slides for the rotator, click the Add Photos button.
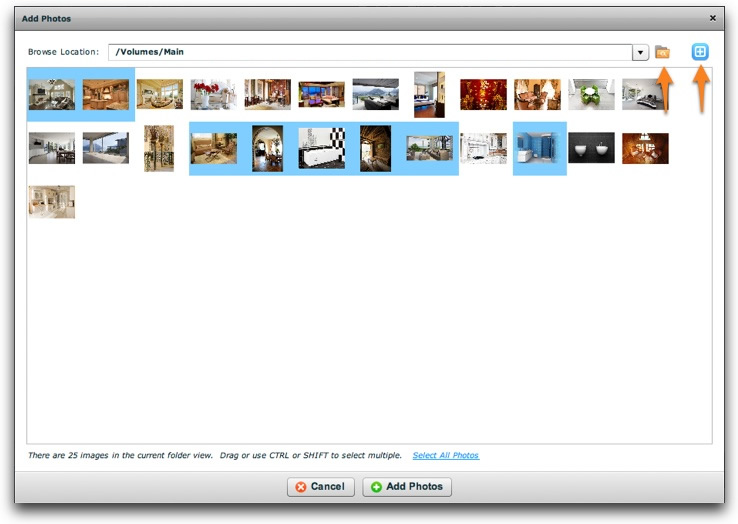
Use the browse button to select the folder within your site that contains images. Click the blue button in the top right to show advanced options, such as thumb size, sorting and filtering. The photos in the folder will be displayed in the grid. For very large photos (e.g. > 4 MB), a placeholder will be shown in place of the real photo; hover over the placeholder to see a preview. Select photos in the grid by dragging, or clicking in combination with the CTRL or SHIFT key. You can use the link at the bottom to select all photos in the view. Clicking Add Photos will add the photos to your rotator and return you to the main view:
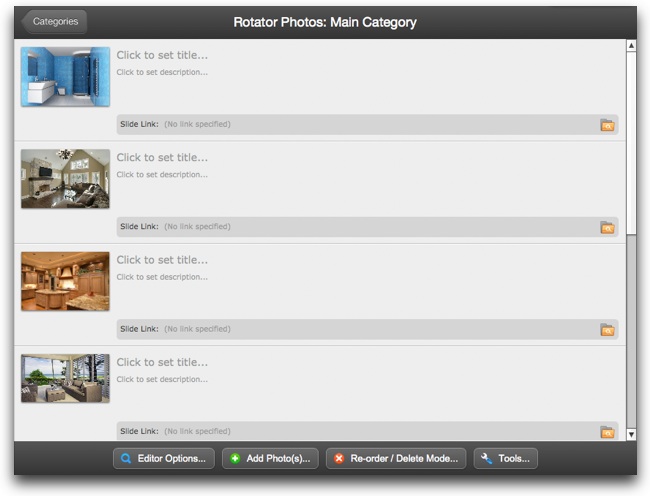
You can see information about a photo along with a larger preview by hovering over it. Double-clicking opens a dialog where you can manually change a photo's source and/or associated thumbnail image. Most of the time, though, you'll only need the options available in the main view. You can specify a title, description and link by clicking and typing on the grayed-out values. HTML can be used in the title and description values.
The Editor Options menu allows you to show more advanced options in the editor, or hide all but the most basic options:
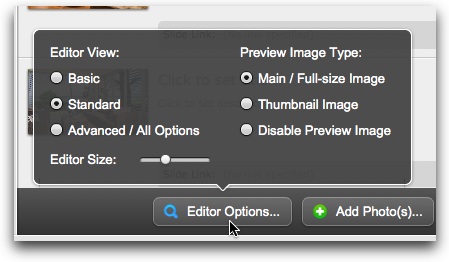
The Editor Size option lets you change the size of each thumbnail, as well as allow more or less room for typing description text. The Preview Image Type option lets you specify what photo should be shown as the preview - the slide's main/full-size image, the slide's thumbnail image, or no preview image.
The Re-Order / Delete Mode button at the bottom lets you toggle in and out of re-order / delete mode. In this mode, you're able to drag around the slides, re-ordering them as needed. You can also remove unwanted slides.
The Tools menu provides access to additional important management tools:
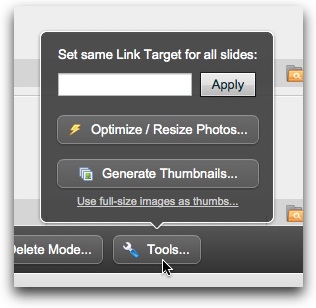
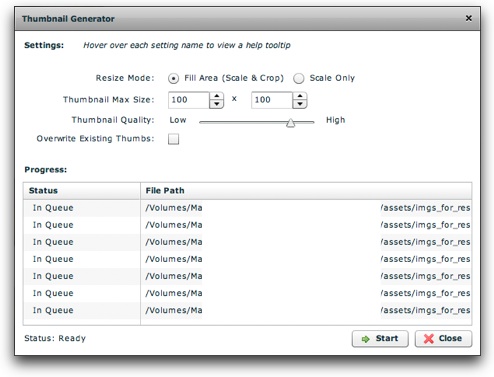
Note that two different photos can be specified for each slide - both a main image and a thumbnail image. For some layout templates, only the main image is applicable, but for others a separate thumbnail image is displayed as well. By default, the same photo is used for both; the thumbnail version is just scaled down. However, you can specify a separate image for the thumbnail. This can be a special scaled and/or cropped version of the full-size photo, or an entirely separate photo. The Thumbnail Generator allows you to create specially scaled and cropped versions of the full-size photos:
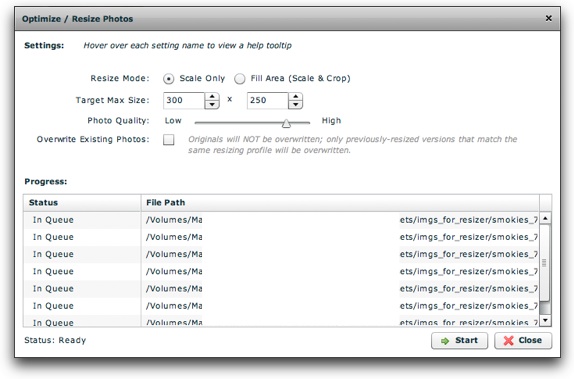
Most of the options are self explanatory; for more information about an option, hover over its label. If you later change your mind after specifying separate thumbnail photos, you can change back to using the same photos by clicking the Use full-size images as thumbs link. The Image Optimizer / Resizer lets you resize large photos to match the size needed for the rotator, optimizing performance and load time. It functions similarly to the thumbnail generator:
Once you've added all of your photos and specified titles, links, etc, you're ready to configure the layout template for the rotator. Use the main navigation menu on the left to change to the Layout / Presentation Section:
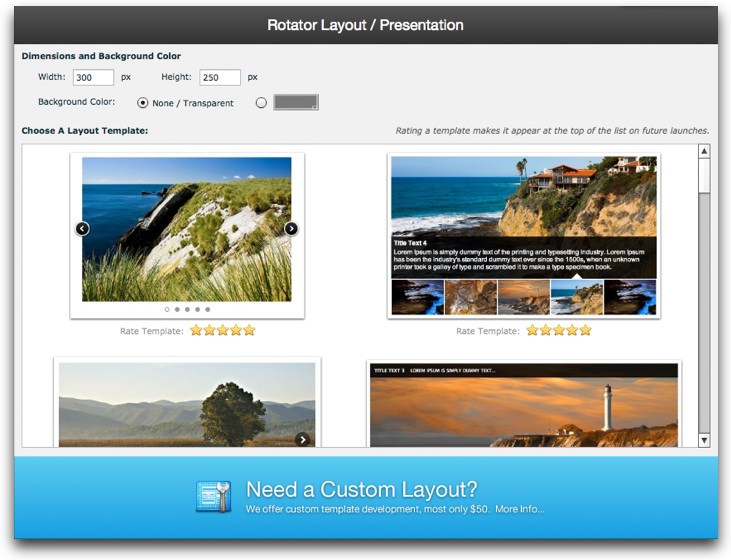
At the top, you can adjust the dimensions and background color. By default, the background is transparent. Then, in the grid below you'll see a preview of all of the installed layout templates. To apply a template, simply click on it. A dialog will appear, letting you choose any available customization options before applying apply the template. If you need a custom template, you can find out more about our custom template development services.
Below each template is a star rater. You can use this to customize which templates appear at the top of the list. Templates with a higher star rating will be positioned first on subsequent launches of the program. This can be used to give easy access to the templates you use most frequently.
Finally is the General Setting section, accessible via the main navigation menu on the left:
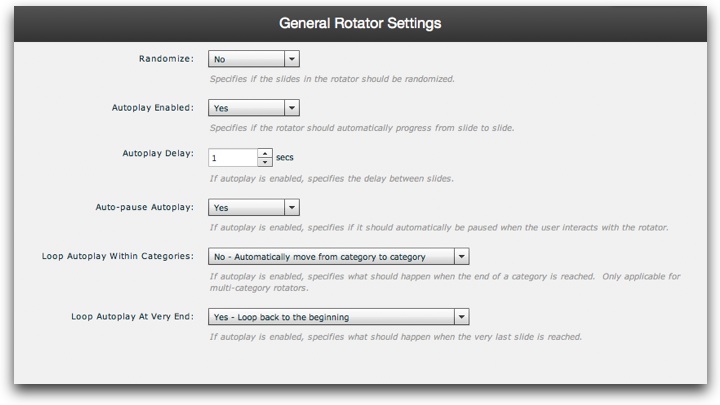
The options here are generally self-explanatory. The randomization option lets you automatically have a different slide order each time the rotator is displayed. Autoplay can be used to make the rotator automatically progress from slide to slide until the user interacts with the rotator.
Once you're done making customizations and you're satisfied with the results in the Preview window, you're ready to click Save and Exit. The results, as well as the steps for editing, depend on whether you're using the Dreamweaver Extension or Standalone version:
- Dreamweaver Extension - The wizard will close and you'll be returned to the Dreamweaver extension's intermediary dialog:
Click the Insert button to actually add the rotator to your page. (If you change your mind and don't wish to add the rotator to your page, click Cancel instead.) The rotator will be inserted into your page at the point where your cursor had been:
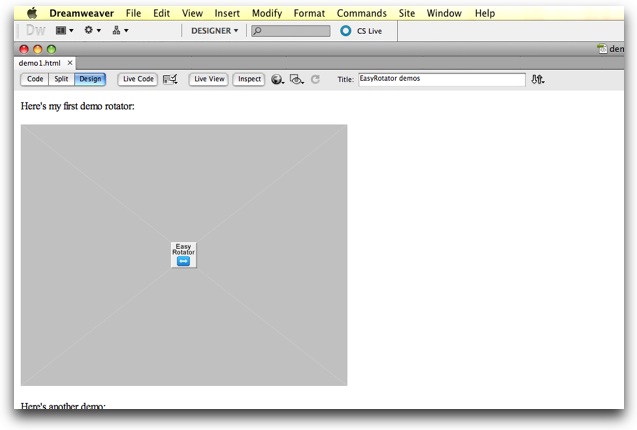
Within Dreamweaver, you will see the gray placeholder in place of the rotator. If you want to preview the working rotator, preview in a browser. You can drag the placeholder around your page to reposition the rotator anywhere you wish. To make edits, select the placeholder and use the Edit button in the Properties panel (Window > Properties):
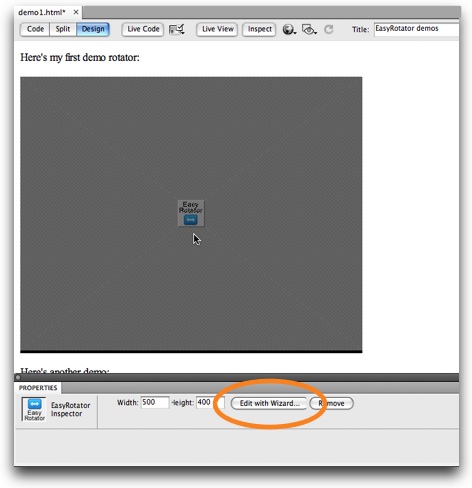
You can also use the inspector panel to quickly adjust the dimensions of the rotator. To insert additional rotators in your page, use the Insert > DWUser > EasyRotator option again as before. - Standalone version - The wizard will close and you'll receive a confirmation that the rotator code has been added to your page. The code will be added to your page at the top of the <body> tag. You'll need to use an HTML or text editor to move this code into the desired position within your page. You'll move the chunk of code that starts with <!-- Begin DWUser_EasyRotator --> and ends with <!-- End DWUser_EasyRotator -->.
To make edits or add another rotator to the page, re-open the EasyRotator program as before. When you're prompted to specify the HTML page and Site Root Folder you're working with, the fields will be auto-filled with the last-used values. Proceeding with the same values, you'll have the option to either edit the existing rotator or insert a new one.
If you have any questions about using EasyRotator, please let us know by opening a support ticket below.
Interactive Support Options
Can't find an answer in the on-demand options? Try interacting with other users on the forums or contacting support: