DWUser.com
Empowering Web Creativity
Support Center - MaxiMenu Extension for Dreamweaver
On-Demand Support Options
This help content is for MaxiMenu v2. For version 1 help, please click here.
Resources to get started and use the Dreamweaver / Standalone version:
KnowledgeBase / Common issues:
Quickstart Installation Instructions
When you download the MaxiMenu2_buildVVV.zip file (where vvv is the build number) from your account, unzip the contents to an easy-to-find location. The first step is to install the wizard program. This step is slightly different for Mac and Windows:
- Windows - To run the installer, double-click the MaxiMenu2-Windows.exe application in the download package. Be patient; it may take a moment to launch. It will install any necessary prerequisites along with the wizard program. Leave the default settings for any installation options unless you're an advanced user and you fully understand them.
- Mac - Double-click the MaxiMenu2-Mac.dmg disk image file in the download package to open it. You will see one item inside: an installer labeled Install MaxiMenu2. Double-click this file to run the installer. (If you receive a warning about the application developer being unidentified, see these directions.) Be patient; the installer may take a moment to launch. It will install any necessary prerequisites along with the wizard program. Leave the default settings for any installation options unless you're an advanced user and you fully understand them.
Optional Dreamweaver Extension Installation:
If you have Dreamweaver, you can use the included Dreamweaver extension for easier access to MaxiMenu for creating and managing menus. To install the extension, first launch the Extension Manager by selecting Help > Manage Extensions in Dreamweaver. (If you have an older version of Dreamweaver that doesn't have this option, launch the Macromedia Extension Manager directly from your Applications/Programs menu. Then, in the Extension Manager, select your version of Dreamweaver from the Products menu.) Click the Install button, then select the MaxiMenu2_DW_ext.mxp file from the download package. (If you're using Dreamweaver CC, select the MaxiMenu2_DW_ext.zxp file instead.) After selecting the file, click OK and allow the installation to complete. Restart Dreamweaver, and the extension will be ready to use.
Quickstart Usage Instructions
The preparation for creating a menu differs slightly, depending on whether you're using the Dreamweaver Extension or not:
- Preparation for Dreamweaver Extension - You must have an existing HTML page that will hold the new menu. (You can create a new page if needed.) Additionally, you must have already created a Dreamweaver Site Definition and saved your page within the site's root folder. (The site's root folder is the folder that holds the homepage.)
Upgrading from v1? Simply open the page that holds the existing menu; you'll have an option to convert the menu in a moment. - Preparation for Standalone version - You must have an existing HTML page that will hold the new menu. (You can create a new page if needed.) Additionally, you must have a single folder that holds all of the files for your site, including the HTML page. This folder is referred to as the Site Root Folder; it is the folder that holds your homepage. If you're not sure what this folder should be, just assume that it's the folder holding the HTML page.
There are two ways to access the MaxiMenu wizard to create a menu, depending on whether you're using the Dreamweaver Extension or not:
- Accessing the Dreamweaver Extension - Place the cursor at the location where you'd like the menu to be added. Select Insert > DWUser > MaxiMenu v2 to launch the wizard. The Dreamweaver communication dialog will appear momentarily:
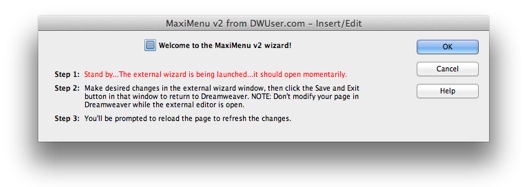
The MaxiMenu v2 wizard will automatically be launched and appear after a moment. - Accessing the Standalone version - You will launch the MaxiMenu2 program directly from your Programs or Applications menu. When you first launch, you'll have to specify the HTML page and site root folder which which you're working. These should be the values you determined when preparing to insert, as discussed above.
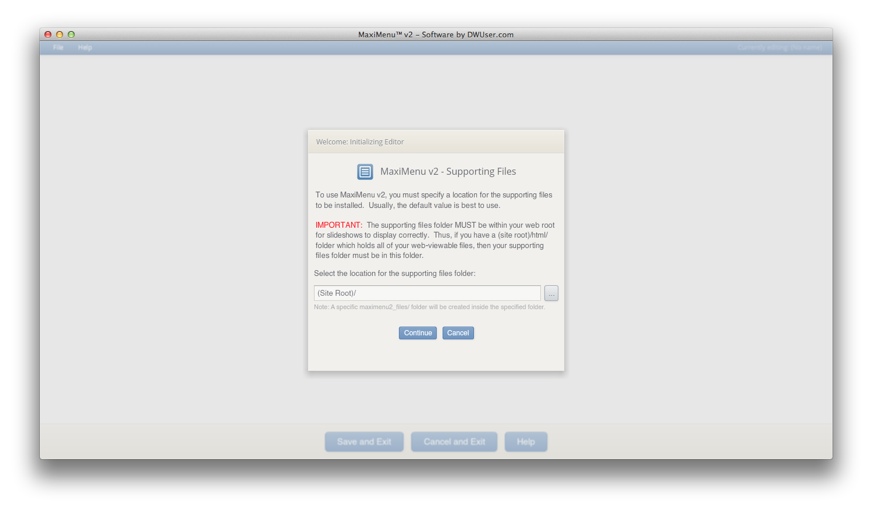
The supporting files are the special files that each menu depends on. This dialog asks where you want these files to be stored. Unless you are an expert user, you should leave the default value. Assuming you're using the default value, simply click Continue to proceed.
You'll next be asked to name your new menu:
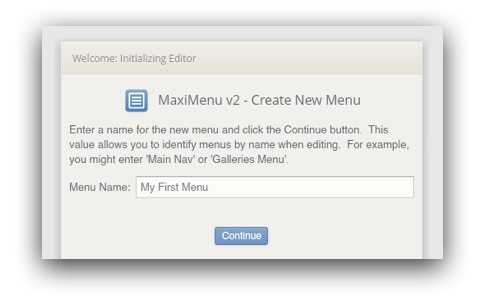
The menu name simply allows you to identify it more easily later. You might enter 'Main navigation' or 'Gallery section menu' or similar. After entering a name, click Continue again.
Note: If there is an existing v1 menu in the page, you will see an option to edit that older menu and use it as the starting point for a new menu.
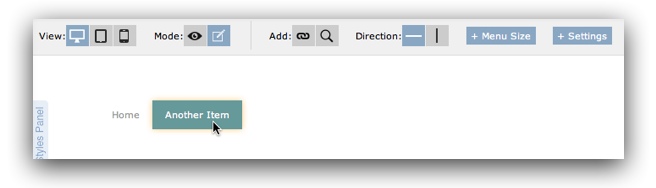
You'll now be in the main edit view:

If this is your first launch, a brief welcome tour will be displayed to help familiarize you with all of the available options. Note that this welcome tour is available at any time via the Help > Show Welcome Tour menu option within the editor.
In the main center area of the editor is the visual menu editor. This allows you to see a true-to-life rendering of how your finished menu will appear. Let's first look at the control options along the top of the screen:

The first option controls the View mode. Menus created with MaxiMenu v2 are responsive, which means they automatically adapt to the screen size on which they are displayed. The View control allows you to preview the appearance your menu will have on smaller tablet or smartphone screens. Please note that the tablet and smartphone previews are only approximate. (For example, the preview still uses hover events to open submenus, whereas mobile devices use the touchscreen tap event.) You should view your finished menu on a physical mobile device for the most accurate preview.
The second option controls whether you are in Preview mode or Edit mode. Edit mode, which is the default when you open the editor, allows you to select and modify menu elements. Preview mode, on the other hand, does not allow editing but displays the finished menu as it will appear and function on your webpage. You can switch back and forth as needed as you create your menu.
Using Edit Mode to Build Your Menu
While in Edit mode, you can click on any menu item in the preview to select and modify it:
(Note: Shift+clicking will select the parent menu or submenu.) You can also click and drag menu items to re-order them.
Once a menu item has been selected, you'll see the inspector at the bottom:

The available options will vary sightly based on what item you have selected; when selecting a menu item, you'll be able to edit the item's title (the text displayed in the menu) and its link (if any). Click the folder icon to the right of the Link field to browse your site and select the correct destination page.
The + More button allows you to access additional options:
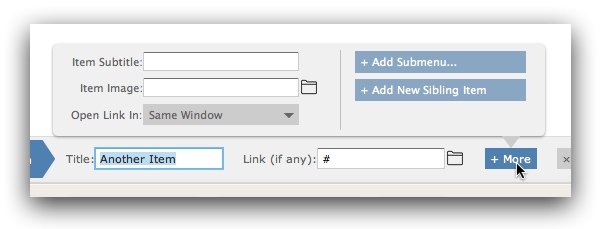
The Subtitle option allows you to specify a line of text that will appear below the item's main text. The Image option allows you to specify an image or icon that will appear at the left end of the menu item. For example, you could add a company logo as the first item in a menu. The 'Open Link In' option allows you to control whether the link (if any) will open in the same window or a blank window. Here's an example of an item with an image and subtitle:

The Add Sibling Item button allows you to add a new menu item after the selected item. The Add Submenu popout menu allows you to easily add a submenu to an item:
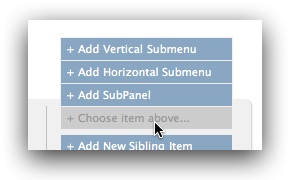
These three options allow you to :
- Add a vertical submenu (most common)
- Add an horizontal submenu
- Add a subpanel (a submenu with multiple vertical columns)
Note that any field for an item may be left blank, including the Title. Once you're finished making changes, you can click anywhere outside the + More popup to hide it.
You can click the Remove button at the right end of the inspector to delete the menu item. (You can also right-click on any item in the menu to easily access an option to remove it.)
Tip: When your cursor is any of the fields, press the Enter/Return key to easily create a new sibling item next to the current item. Press Shift + Enter/Return to create a new submenu instantly.
When editing a submenu item, you can hover over the left end of the inspector to easily select a parent item:
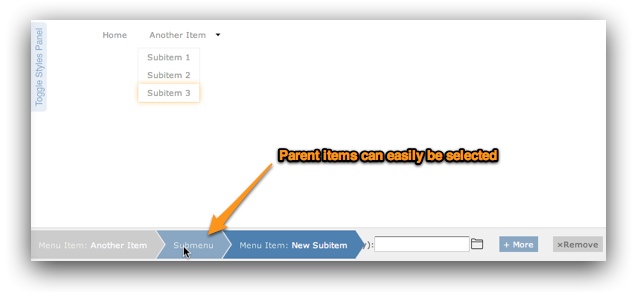
When a submenu is selected in this way, you can access additional configuration options for it in the inspector:
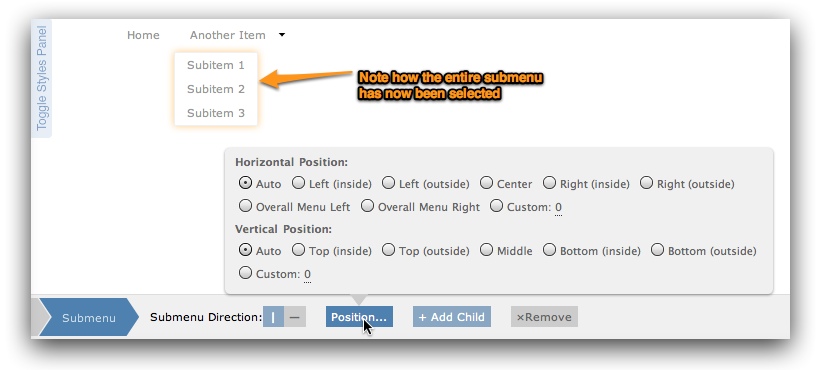
The submenu's direction can be switched between horizontal and vertical; its position can be modified; a new child item can be added; or it can be removed altogether.
Additional Top-Level Tools
On the main control bar at the top of the edit window, there are additional tools and options available for the top-level menu:

The first two buttons allow for adding a new link or search box to the top-level menu. A search box allows you to hook into existing search functionality on your site by adding a search textbox to your menu (note that it doesn't add new backend search functionality). Whatever link is specified for the search item should include a {q} parameter; when the menu is used online, this will be replaced with the actual search term(s) entered in the textbox.
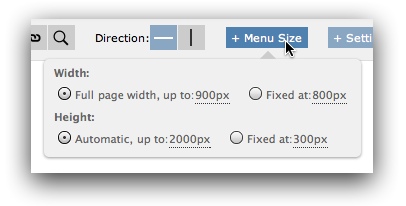
The Direction option allows you to change the horizontal/vertical orientation of the entire menu. The + Menu Size popup allows you to customize the menu's size, making it fixed or automatic:
The + Settings popup contains options such as the submenu transition effect:
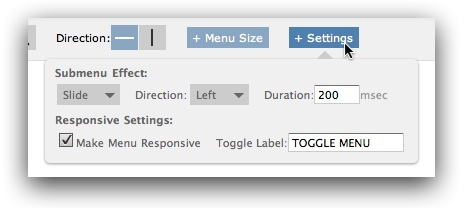
You can disable the submenu transition altogether, or adjust its speed via the Duration option. You can also disable the menu's responsive functionality or customize the menu toggle text that appears on mobile devices. (You can preview this text by using the tablet or smartphone preview modes mentioned above.)
Customizing Menu Styles
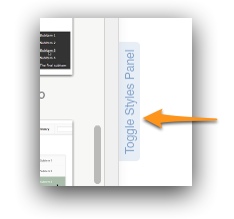
Once you have finished adding links to your menu, you can customize its appearance using the Styles Panel on the left. Note that this entire section can be temporarily hidden to allow more editing space via the Toggle Styles Panel button:
In the upper portion of the Styles Panel, you'll see available menu themes:
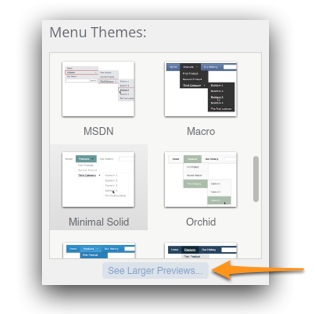
To view larger previews, you can click the See Larger Previews button below the list; this allows for easier theme selection:
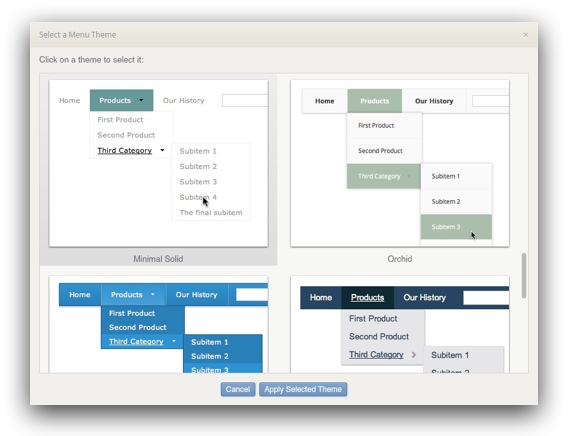
Note that all themes are simply a starting point and can be significantly customized, especially with regard to colors. Once you've selected a theme, you can make desired adjustments below in the Style Options section:
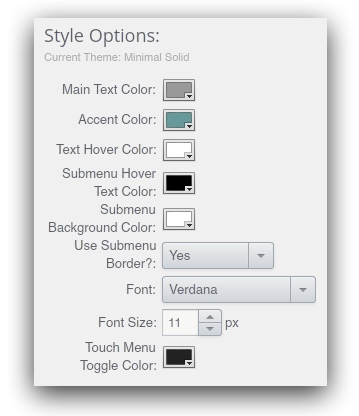
The specific available options vary based on the selected theme. As you adjust these settings, the changes will instantly be reflected in the preview on the right. Every theme will offer the Touch Menu Toggle Color option, which controls the color of the text that is displayed to allow toggling of the menu on touchscreens.
By default, the preview has a white background. You can customize the preview's background color in the File > Advanced Preferences... dialog. (Note that this only affects the preview, not your actual page.) There is also an option in the Advanced Preferences dialog to enable style source code editing. If you're an expert user, you can use this option to enable a source editing button at the bottom of the Style Options panel. Only use this option if you're familiar with editing code. To learn more about editing menu CSS, please see this article.
Once you're done adjusting settings and are satisfied with the results in the preview, you're ready to click Save and Exit on the bottom control bar:

You will be asked if you'd like to add this menu to other pages as well:
If you click Yes, you'll be able to select other pages in which to insert the menu:
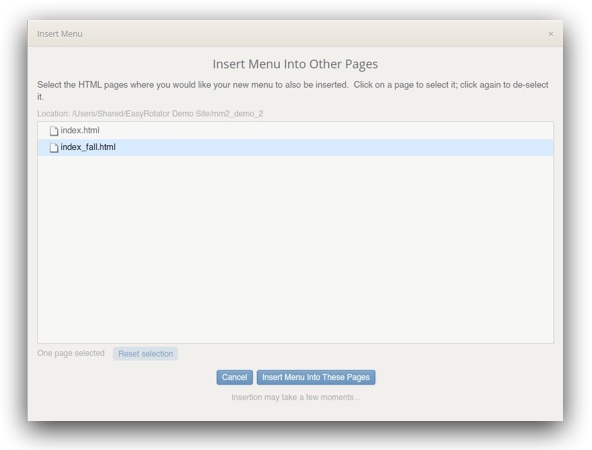
To select a page, click on it once; to de-select a page, click it again. When using this insertion tool, the menu will be inserted at the top of each document and you can move it to the appropriate location in the page. If you are using Dreamweaver templates for your site, you will likely wish to instead add the menu directly to the template file.
Once you're done, the results - as well as the steps for editing - depend on whether you're using the Dreamweaver Extension or Standalone version:
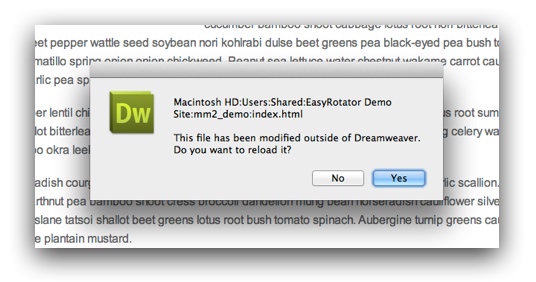
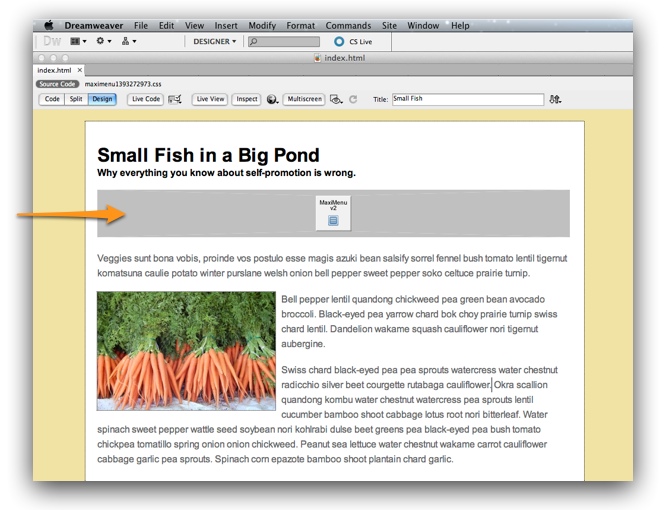
- Dreamweaver Extension - The wizard will close and you'll be returned to Dreamweaver. You'll be prompted to reload the updated page:
The menu placeholder will appear wherever you inserted the menu:
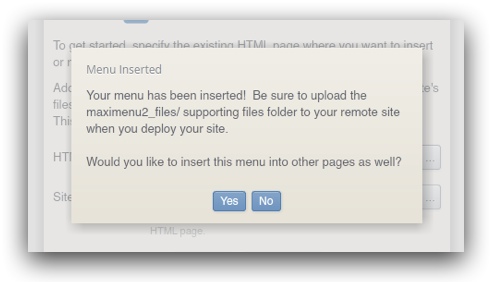
If you want to view the working menu, preview the page in a browser. When you're ready to view the page online, be sure to upload the maximenu2_files/ supporting files folder. If you only see a gray box, an empty space, or an error when previewing, check this article for common issues and their solutions.
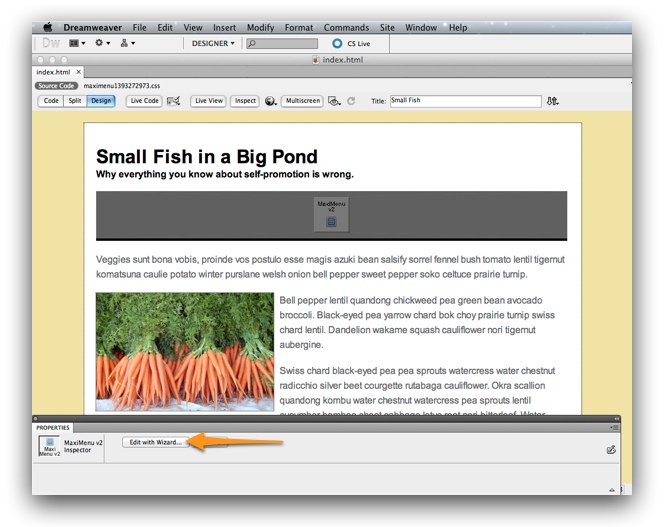
To make edits, select the placeholder by clicking on it, then use the Edit with Wizard button in the Properties panel (Window > Properties):
You can also use the inspector panel to quickly remove the menu. - Standalone version - The wizard will close and you'll receive a confirmation that the menu code has been added to your page. The code will be added at the top of your page, just after the opening <body> tag. You'll need to use an HTML or text editor to move this code into the desired position within your page. The code starts with <!-- Begin DWUser_MaxiMenu2 --> and ends with <!-- End DWUser_MaxiMenu2 -->
If you want to view the working menu, preview the page in a browser. When you're ready to view the page online, be sure to upload the maximenu2_files/ supporting files folder. If you only see an empty space or an error when previewing, check this article for common issues and their solutions.
To make edits or add a menu to another page, re-open the MaxiMenu2 program as before. When you're prompted to specify the HTML page and Site Root Folder you're working with, the fields will be auto-filled with the last-used values. Proceed with those same values to edit the existing menu.
When re-launching the editor to make edits, you'll have several options:

You can perform the following tasks:
- You can select an existing menu to edit via the Edit Menu dropdown. Note that any older v1 menus will also appear on this list, allowing you to migrate them.
- You can add an additional menu to a page via the Create New Menu button.
- You can quickly insert an existing menu into multiple other pages via the Insert Existing Menu Into Multiple Pages button at the bottom.
Whenever you edit a menu, you'll be prompted afterwards to optionally scan your site for other pages that use the menu and update them as well. If you don't want to update other pages at that moment, you can do so later by simply opening the editor again and immediately clicking Save and Exit without making any changes; you'll again be asked if you want to scan and update other pages.
When re-launching the editor application on a different page that doesn't yet contain a menu, you'll see the options shown above plus an additional option to directly insert the menu you created earlier.
Have Questions?
If you have any questions about using MaxiMenu v2, please let us know by opening a support ticket below.
Interactive Support Options
Can't find an answer in the on-demand options? Try interacting with other users on the forums or contacting support: