Why You Need a Local Testing Server (and How To Do It)
by Dana Winslow

Any web site that uses server-side language requires a server to run. Sounds pretty obvious spelled out like that, right? It's right there in the name... server-side language..
So, now you're wondering what a server-side language is, and whether or not you're using one. Well, if you're building a web site that uses even the simplest of databases, then you're using a server-side language. It's just code that's processed on the server before being sent to website visitors. For example, PHP or ASP or ColdFusion.
There are all sorts of languages out there. So I'm not going to go into which server-side language is best for you, which one you should use, or even how to pick the best one in this article. I will tell you that they all require a server to run. So regardless of your experience and expertise at any or all of the server-side languages, you cannot preview that site you're working on until it is living in a server environment.
There are two server environments to choose from: local and remote. A local server is, as you might have guessed, hosted locally on your own computer while a remote server is hosted elsewhere. It might be a paid hosting plan, another computer on a local area network, or even a free hosting plan; regardless, a remote server is a server that is not on your computer.
So, which type is best for testing? That's really up to you. I prefer the local server route, and that's what I am going to focus on today. But I often encourage my clients to also set up remote testing servers, which I will also cover today.
Do I Even Need a Test Server?
Um... yeah. Unless the only language in which you ever build web sites is 100%-static HTML then, yes, you need a test server.
And before you say you're an expert in PHP, ASP, ColdFusion or any other language – there are still mistakes to be made. And quite often these mistakes can't be found until you see the site running. And since a server is needed to execute the dynamic, server-side code and turn it into HTML, this means you absolutely need a test server to preview and test the various aspects of your site.
I Know What I'm Doing... Can't I Just Test Everything on the Web Site?
Eeek, I cringe at the thought.
Technically speaking, yes you can absolutely test everything you want using the web site itself. But it's not recommended no matter how experienced you are. Anything can go wrong. A simple mispelling can result in the site getting locked down, forcing you (or someone else) to scramble to regain access and undo what you did. Security holes may appear while you're testing.
And even if the worst case scenarios don't happen... the client may choose to go and check things out before you've updated or debugged things. Depending on the client, if he or she decides to check out the site and sees a mess, he could very well start losing faith or enter into a panic. Neither of which offer very good outcomes.
And finally, if it's a site that has already been launched, then it just doesn't make sense to do any more testing on it. Sure, while the site is brand new and not yet available to the public, testing on the site itself has fewer risks. But testing on a site that is already established can lead to embarrassment, excessive downtime and even security breaches.
No, no... Even if you are the absolute most experienced developer in all the land – I still wouldn't recommend testing anything directly on the web site. It's much better to do the majority of your testing on a local server that only you can access, some pre-launch testing on a remote server that you and your client can run through, and leave your live site a test-free zone.
What Can I Do on a Local Test Server?
Almost anything.
If it is or will be going on a live web site, then it can be accomplished on your local test server. Whether you're testing out layouts, shopping carts, auction scripts, memberships, or even directories – it can always be set up on your local server. Whether you're testing for workflow or compatibility, installing everything onto your local server is generally a good first step in the debugging process.
And don't forget all the new toys... :D
I can't count how many hours I have wasted just playing with new toys on my local server with no particular client in mind. I see a new module come out for Drupal – I get it installed and start playing almost immediately. It's for this very reason that I constantly keep a new installation of Drupal running on my local test server.
By running a local test server, you give yourself the opportunity to build upon your already strong skill set, expanding to new territories and making yourself an even stronger developer. You can also work virtually uninterrupted from network failures, Internet outages or other headaches that might keep you from uploading everything onto a remote server. And by having a local test server, you won't have to waste any time uploading, testing, fixing, reuploading, retesting, etc. Installing your favorite CMS onto your local test server requires only that you extract the files into the correct folder.
And most of your favorite browser extensions will still work while you're viewing your site from your local test server as well. Whether you're using YSlow, SEO Doctor, Firebug and just about any other extension you can think of. These all still work very well to help you check things out on the site while it's still on your local test server.
Of course, there are still a few things that won't quite work 100% until your site is up and running on a remote server. Things like analytics and load times won't be accurate until you're accessing the site from a remote location. This is especially true of load times – since loading a web site from your local computer is always faster than loading the same web site through a network.
And best of all, you can do all these things without affecting the integrity or security of a live site. Even some of the most tested and widely used systems in the world can have security holes in them. Sites built on WordPress or Drupal, for example, are constantly being modified and improved upon to avoid and address these weaknesses in security – ones that exist despite their popularity and widespread use. When working on a new plugin or module or sometimes even just a new feature with either of these two content management systems, security can be threatened – even if only for a few minutes. And I don't think I need to tell you what can happen to a web site that loses its top notch security for a few minutes.
What Is a Test Server?
Years and years ago, when Perl was still very, very new, I didn't know very many people who had test servers. In fact, I think that out of the hundred or so web developers that I knew, only two or three of them actually had a test server. This is an abysmally low ratio compared to today.
You see, back then, test servers were something of a luxury. Large web development companies and corporations had walls of servers available for, well, anything really. They used them for testing, staging, hosting – you name it. Individual or freelance web developers were a little harder to come by back then and most did not have a local testing environment set up. Of course, this was also before all the wonderful tools that I'm about to show you were even available. Back then, setting up a local testing environment was a bit of a pain. Granted, the pain was totally worth it if you were able to get it working. But for many freelance web developers setting up a local testing environment back then was a time-consuming endeavor and was better done remotely. "Let the webhost take care of it," was the general rule.
One thing to keep in mind is that a server is not a piece of hardware. I know when I talk about servers many of you are probably picturing small boxes that look similar to small computer towers sitting up on shelves. Even I have that picture in my head sometimes and I know better!
Setting up a server is more about the software than it is about the hardware. You can use your standard Windows or Mac computer; you just install some software and, voila!, you have a testing server. Specifically, you'll need to install Apache (the actual web server), MySQL (the database server) and PHP. (You can actually install any other server-side language that you prefer. I prefer PHP, so that is what I am using. Plus, since I usually work using Drupal – which is based on PHP – this is a natural choice for me).
Is There a Preferred Method to Installing All this Software?
There are three primary methods from which you can choose for installing the three pieces I just mentioned (web server, database server and server language):
- Use a single application that will install all three. This is the easiest and fastest way to get a local test server up and running with the smallest headache, and a favorite method for many freelancers and new developers. However, this method can lack flexibility. The components within depends on the vendor's set up. And if you're trying to get your local test server to match the production server as closely as possible, then this will make that very difficult.
- Install precompiled, ready-to-go binaries of each component. Though not quite as easy to do as the first option, this option does give you a little more freedom and a better chance that your local test server will closer match that of the live production server. Although you may have to wait a little on updates and the like and you will be limited in terms of configuring extensions (although you can choose which version of each component you would prefer), you will be able to pick and combine any of dozens of applications to build a closer match. Perhaps you want to use Perl and ColdFusion instead of PHP? Or maybe you prefer PostgreSQL to MySQL? This option allows you to do that.
- Compile and install each of the three components yourself using their respective source codes. Now, this is the most flexible way to ensure that your local testing environment is as close to the live production environment as possible. But this is also the most painful way to go – especially if you're trying to set up a local test server for the first time. You can tuck this method away in your memory bank for now, as I'll be focusing on the easier methods.
So, if I Have a Local Test Server, Why Should I Ask My Client About a Remote Test Server?
There's no rule saying that you need both a local test server and a remote test server; this is just the set up that I generally recommend to my clients. And it has to do with workflow and usage of each of the servers.
First, my local test server is only accessible to me. I can go in there and fiddle around all day. I can send screenshots to my clients, notes and emails to my clients. I can even write out a detailed explanation about everything new that I've discovered and played with while on my local test server. But they cannot access the server itself. They can't hop onto their computer and take a peak at their website mid-development to see how far I've come. They can't determine whether or not they like the look and feel of their site, the user-friendly experience or the workflow. Outside of what I choose to tell them, my clients have no idea what is happening on my local test server.
And that's kind of a scary place to be if you're a client. As a client, I would want to know what's happening with my project, even if I don't completely understand everything that you're doing.
Oh, Okay, so you just installed the thingamajig and now I can write my web pages and just click on a button to make it look bold? Perfect. Can I try?
That's what most clients care about... Can I try it out? They don't care that the thingamajig is actually a WYSIWYG Editor (that looks kind of close to a thingamajig though, huh?). They appreciate the emails and the screenshots – but they like demos. Whether it's because it gives them a feeling of power to have to approve something before it can go live, or just a matter of trying to learn their website before anyone can ask them any questions, clients like playing with all the little thingies, whatchamawhoozetts, thingamajigs and gadgets that you're placing on their site. They like knowing first hand how it's going to work, even if they don't understand the technology behind it.
And this is what having that second, remote test server gives them. A chance for them to play and get to know their site before it goes live. It also allows you to do some last minute testing that might have required a remote server – such as load times, performance audits and the like. Since all the major issues such as security holes and compatibility checks were done on your local test server before uploading the site in all its glory to the remote test server, there's very little reason to worry.
For those of you who, like me, primarily work with either WordPress or Drupal, this is also a good platform to teach your client how to manage his or her site before it has been launched. They may have questions regarding how to create or update content, how to customize certain aspects, or other notions that might not have been requested of you as of yet. This way, you can walk them through all these things and they don't have to worry about the live site being affected at all. And they can be fairly certain that the live site will function almost exactly as the remote test server functions.
Setting It Up: Choosing an All-in-One Application
So, as I mentioned before, the easiest method to install all this new software onto your local test server is to find an all-in-one application that will install the web server, database server and language within just a few moments. There are a few to choose from, so to be honest if you're not happy with one then you might have better luck with one of the others out there. I have used two of these applications successfully in the past, XAMPP and MAMP. The primary difference between these two is spelled out right in the name:
- XAMPP (Cross-platform, Apache, MySQL, PHP, Perl) works, as its name implies, across many platforms including Windows, Linux, Solaris and Mac OS X.
- MAMP (Mac, Apache, MySQL, PHP, Perl or Python) works very well on Mac OS X; not available on any other platforms.
For the most part, choosing between the two is going to be a matter of whether you're using Windows or Mac. As a Mac user, I find the interface for MAMP much simpler and easier to navigate and work with. If you're running on Mac OS X as I am, then you have your choice between the two. You can try both and then settle for the one you like the best. (I would probably start with MAMP, though, as some folks have experienced trouble with .htaccess files on XAMPP on Mac.) If you're running Windows, however, then you should go with XAMPP. On Windows, you do also have the option of WAMP (W for Windows); but most folks find XAMPP to work just fine so I'll be focusing on that today. I have had success with both XAMPP and MAMP.
Outside of the initial installation time, I did not experience any real difference in regard to speed or performance between XAMPP and MAMP. Both worked well for me, neither crashed or became choppy or hard to work with. But it did take me longer to install XAMPP and get it to work than it took me to install MAMP. I know that there are a lot of reviews out there saying that one or the other is faster, works more smoothly, etc. – but I never saw any of those differences. Your own experience may be different... You have been warned :-).
Installing MAMP
If you're not using Mac OS X, then you can skip down to Installing XAMPP.
First things first, you'll need to download and install the MAMP program. I use the free MAMP distributed under the GNU General Public License. Whichever version you choose, go ahead and download the software to your computer.
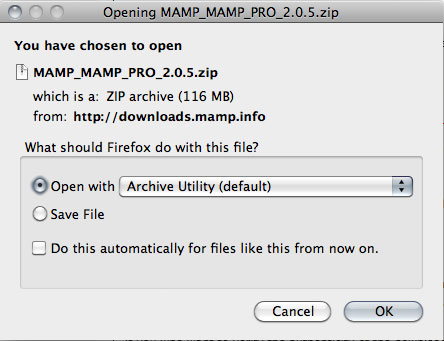
Next, double click on the .pkg file to start the installation.

As is par for the course of most applications for the Mac, installation is easy – a couple of clicks, agree to the terms of service and enter your admin password and you're golden.

And now, of course, once you go into your Applications Folder, you'll see a folder for both MAMP and MAMP Pro available to you:

The Pro version is a trial of their industrial-strength server; we don't need that, so we'll be using the plain old MAMP application. Opening the MAMP folder brings you to the MAMP application, which starts up easily. Both the Apache and MySQL Servers start automatically and you can see the progress right away with their convenient red light / green light set up. Once the lights turn green (about 2 seconds), you're ready to go:

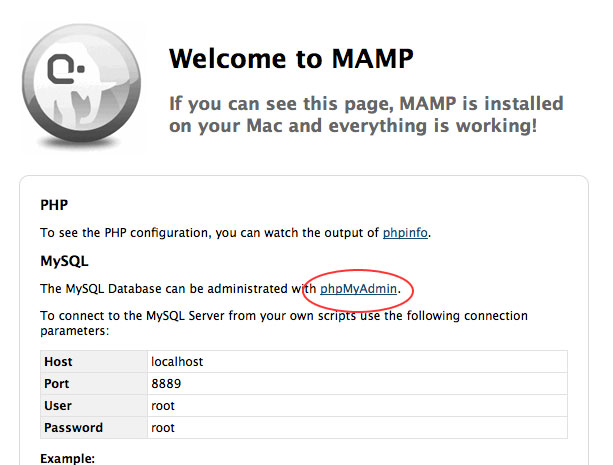
Now that every thing is installed, we can check to ensure that it's installed and working correctly by clicking on the button that reads Open Start Page.

And it really is that simple... It probably took me longer to type out the steps than it will for you to get this server set up. Of course, there's no site or even a page or anything else set up yet. For that, you'll need to place your site into the htdocs folder inside the MAMP folder; it should be empty right now:

Now that your server is all set up, there are a couple of other things that you might want to set up. For example, remember that MySQL username and password that we read on the MAMP Start Page? Well, if you don't remember, that's okay. By default, both the username and password for MySQL were set to root. As you might imagine, this is not a very secure combination. Even though you're only testing locally, take the time to change those before moving forward:
- Open up Terminal and type in the following:
/Applications/MAMP/Library/bin/mysqladmin -u root -p password [NEWPASSWORD]where[NEWPASSWORD]is replaced with, you guessed it, your new password. You'll be asked for your current password (root) to confirm the change. Once you enter the current password, your new password will be in effect. - You'll also need to change your password in three different files to ensure that everything continues to work properly. Replace the words in red with your new password in each of these files:
/Applications/MAMP/bin/phpMyAdmin-X.X.X/config.inc.php(around line 86:$cfg['Servers'][$i]['password'] = 'root'; // MySQL password)/Applications/MAMP/bin/mamp/index.php(line 5:$link = @mysql_connect(':/Applications/MAMP/tmp/mysql/mysql.sock', 'root', 'root');)/Applications/MAMP/bin/stopMysql.sh(line 2:/Applications/MAMP/Library/bin/mysqladmin -u root -proot)
Now we're ready to put that local server to good use!
Installing Drupal onto Your New MAMP Local Server
So, now we want to make your local test server useful. First, we're going to install Drupal and create a little website on the local test server. If you don't want to install Drupal or you'd rather install a different CMS, you're welcome to do that as well. Many of the same steps will apply, however, so I recommend reading through this section anyway.
Of course, it probably goes without saying that you'll need to download the latest version of Drupal from the drupal.org web site. Extract the files into a directory within your htdocs folder and rename the folder to whatever you want to name your test server. In my case, I have named the folder test.

Next, we need to set up our server to actually run this new Drupal installation. So, make sure that MAMP is running and return to your MAMP Start Page. From there, we are going to set up the database by clicking on the phpMyAdmin link:
If you've been developing for a while you're probably already familiar with this next page and how to set up the database. For you newbies out there, or if it's been a while, here's where you're going to go.
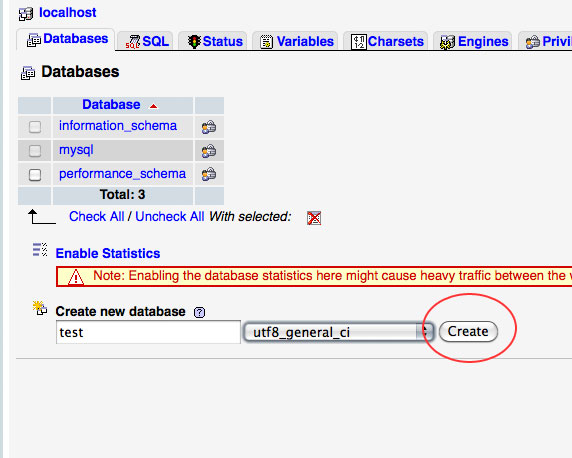
First, click on the "Databases" tab. Then, in the space provided, enter a name for your new database. I'm going to keep mine very simple for you and simply enter test. Finally, change the Collation to utf8_general_ci and click on the Create button:
Now, of course, you need a username and password so that Drupal can access your database. So, go back to the main PHPMyAdmin page (click on the logo near the top left of the page) and click on the Privileges tab. From there, click on the link that reads Add a new user:

Fill out the login information with any username and password that you like. Make sure that you change the Host to Local. Leave everything else blank and click on the Go button near the bottom of the page.

On the next page, skip down to the "Database-specific Privileges" and choose your new database using the dropdown menu:
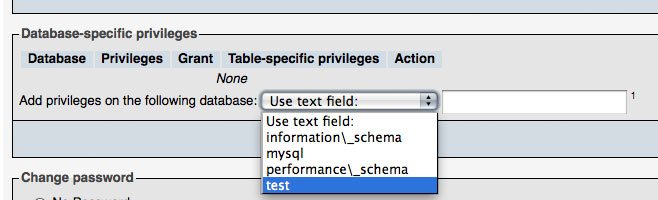
There are eight (8) privileges that you are going to choose. These are SELECT, INSERT, UPDATE, DELETE, CREATE, DROP, INDEX and ALTER. Check the corresponding boxes and click on "Go".

And with that, you should be ready to rock and roll. Point your favorite browser to your new local test server by going to http://localhost:8888/test and you should see the start up screen for your new Drupal installation. Of course, if you named your test server something other than test, you'll need to point your browser to that folder instead.

Installing WordPress Onto your new MAMP Local Test Server
For those of you who prefer WordPress to Drupal, installation onto your new local test server is not much different. Again, you'll need a database, complete with username, password and privileges. You'll also need the latest version of WordPress available from the wordpress.org web site.
Just as before, extract WordPress into the htdocs folder and rename that folder to whatever you would like to call it. From the MAMP Start Page, go to phpMyAdmin and create a new database for the WordPress installation then create a user for it. Again, make sure that your user is granted all the privileges that it will need to modify the database.
Open the wp-config-sample.php file using your favorite text editor and fill in your database details. Specifically, you'll need the database name, your username and your password. Then save the file as wp-config.php.
And that's it. Now, to install Wordpress, you do the same thing that you did to install Drupal. That is to say, point your favorite browser to http://localhost:8888/[name of new folder] and you should be able to fill in the information for your new WordPress site:

And one last advantage of this set up? You don't have to choose between Drupal and WordPress. That's right. As long as you have a separate database for each, you can install both Drupal and WordPress onto your new local test server. I find this extraordinarily useful, especially during my busiest months, because it means that I don't have to go through the headache of uninstalling one just to install the other between clients. Just make sure that their folders, located in the htdocs folder, are separate and that each has its own database and you shouldn't have a problem.
Additionally, since MAMP does not alter or change anything on Mac OS X, removing the program is as simple as deleting the folder from your applications. Of course, if you delete it, you will remove everything, including your Drupal and Wordpress files, from your computer. I guess that goes without saying... but I have had people ask me about that before.
Installing XAMPP
If you've used MAMP (or you read my guide above), you'll no doubt notice that there are some similarities between the process of installing XAMPP and that of installing MAMP. Starting, of course, with downloading the version of XAMPP that suits your working environment. (I like to stick with the latest version of everything. However, if you need one of the older versions of XAMPP for any reason, they are available on SourceForge.)
Once you've downloaded the correct edition of XAMPP for your operating system, follow the installation instructions provided. For my fellow Mac users, that means dragging the XAMPP folder over to your Applications folder.

Next, open XAMPP Control. You'll notice a small box where you can start Apache, MySQL and FTP. Since all your files will be hosted on your computer, you don't need the FTP, but go ahead and start both the Apache server and the MySQL server.

Now, of course, you'll want to check everything out. So let's go to our favorite browser and point it to http://localhost/

And once I select my language, I'm brought to the XAMPP Start Page. Just like the MAMP start page, there is a link to phpMyAdmin where I can set up the necessary databases that I will use for the sites I build on this local server. Additionally, to put this local test server to good use, you'll need to take some security precautions (such as setting a password for MySQL). For a checklist of these issues and how to remedy them, click on the link that reads Security. Address the security issues that concern you and we're ready to put in a site.
Installing either Drupal or Wordpress (or any other CMS that you might prefer) works very similarly with XAMPP as it did on MAMP. First, set up your necessary database using phpMyAdmin. The database will require a user with all the permissions to modify that database. Then extract the necessary files into the proper folder; as with MAMP, this will be the htdocs folder in your XAMPP installation's folder. And voila... no matter which CMS you've chosen to install, pointing your browser to the correct address will bring you to their installation process so that you can proceed.
Conclusion: Get Testing!
As I said earlier, using either of these two applications will provide you with Apache, MySQL and PHP. While there is a little bit of flexibility, there aren't tons of options built into these systems. For example, MAMP gives you the option of choosing PHP 5.2 or PHP 5.3... but that's pretty much it. With a little advanced fiddling, however, you can add other pieces as well.
With both of these systems, you will need to make sure that the application is running when you want to work on your local test server. This means starting the application and making sure the Apache server and the MySQL server are running before pulling up the site in your browser and starting to work.
All three components – Apache, MySQL and PHP – are constantly changing, being developed and updated. This of course means that what you install one month may become outdated in another couple of months. If you want to keep up to date with all the changes, you'll need to check for software updates regularly. And while I like to keep everything up to date, it's also important to keep your local test server as close as possible to the server environment that your client's site will be built on. This will make the transition from testing to live much smoother. Often, webhosts will be running slightly older versions of server software.
Having a local testing server makes it much easier to create clean, well-tested code. And we all want that, right? Thanks to this article, you can now get started with your very own local testing server.