Download Help PDF (29MB) | Search:
The Overlay Text tab is where you can specify text which is overlaid over the image, in a manner similar to Microsoft Powerpoint. Each separate box of overlay text can be timed to appear and disappear at a specific point with a customized effect. The text styling is fully customizable as well. HTML can be included in the text for event more control. The tab appears as follows:
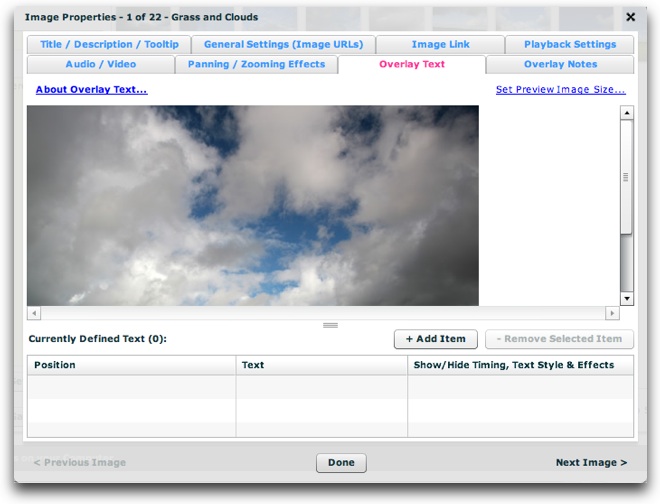
On the top half of the window, there is the preview image. This allows you to position the text over the image while seeing how it will appear when the slideshow is viewed. On the bottom half of the window, a list of all overlay text on the slide is displayed. To resize either of these parts of the window, use the resize handle between them:

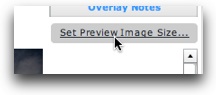
By default, the preview image is shown at its full size. In some instances, this may not be a realistic preview because your slideshow will display the image at a scaled-down size. In order to make the preview more realistic, you can change the maximum width of the preview image, thereby forcing it to resize down. To do this, click the 'Set Preview Image Size...' button at the top right:
In the Set Preview Size dialog which appears, you can drag the slider to set the new maximum width of the image:
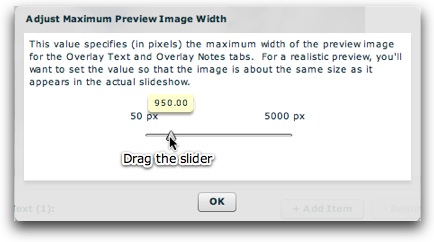
The default value is 5000 pixels, which ensures that the image isn't scaled at all. A smaller value will force resizing to occur. After making any changes, click the OK button to return the main dialog.
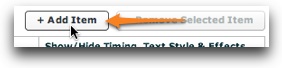
To add overlay text, click the '+ Add Item' button:
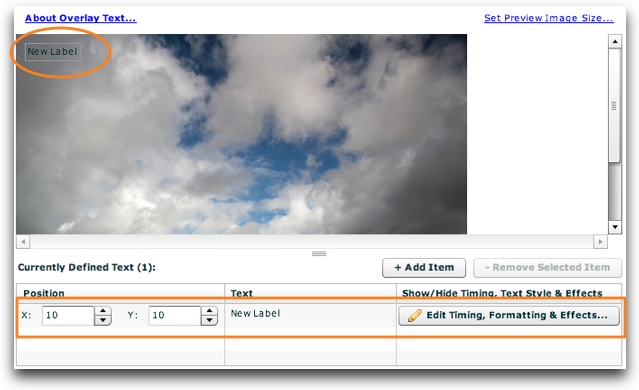
A new overlay text box will appear on the preview image, and a corresponding item will be added to the grid at the bottom:
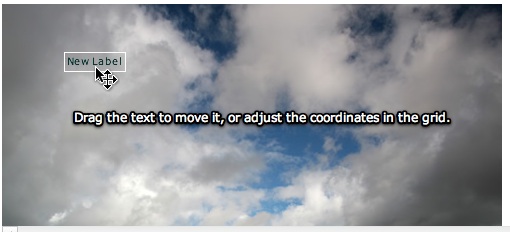
You can reposition the text in one of two different ways. First, you can drag the label around on top of the preview image:
Or, you can set the X and Y coordinates directly in the grid:

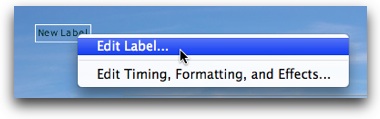
To set the text, double-click the preview label, or Right/CMD-click it and select 'Edit Label':
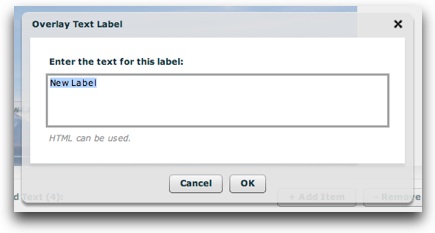
This will open a dialog where you can change the text (HTML can be used; multiline text is supported as well), then click OK:
You can also set the text by clicking the label value in the grid. It will become an editable textbox where you can enter the desired value:

As noted earlier, HTML can be used within the text value. After changing the text, the preview text which floats over the preview image will be updated as well.
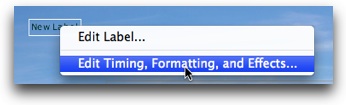
To edit the timing (when the text appears and hides), formatting (how the text looks) and effects (used for showing and hiding), Right/CMD-click the label and select 'Edit Timing, Formatting, and Effects...':
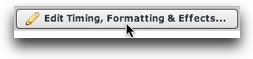
Note: You can also access these settings by clicking the 'Edit Timing, Formatting & Effects...' button in the grid:
Selecting either of these options will launch the Overlay Text Settings Editor dialog.
Accessed by clicking the edit button in the overlay text grid as mentioned above, the Overlay Text Settings Editor dialog appears as follows:
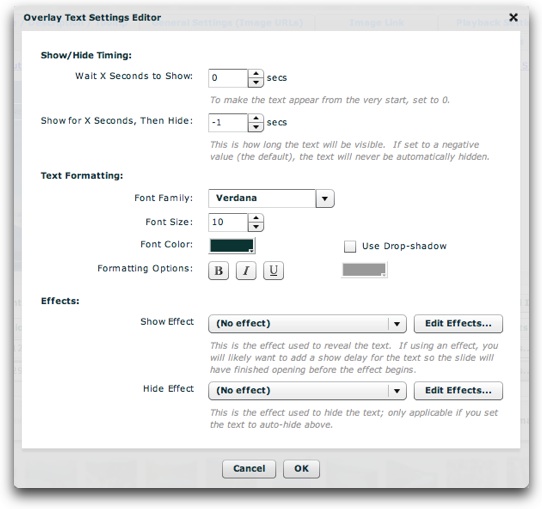
Each option controls the following. If any option is not specified, the default value is used.
| Property | Description |
|---|---|
Wait for X Seconds to Show (AKA Show-delay) |
This value can be used to specify a delay before the text appears on the image. The default value, 0, means that the text will be visible as soon as the slide opens. If you use a Show Effect, you'll likely want to add a small show-delay for this option so that the slide will have fully opened before the text appears. For an example, see the Timing Examples below. |
Show for X Seconds, Then Hide (AKA Visible-time) |
This value can be used to make the text automatically disappear after a certain length of time. If set to a negative value (the default), the text will never be automatically hidden; it will remain visible until the slide is closed or removed. For an example, see the Timing Examples below. |
| Font Family | This is the font face used on the text. Select from the dropdown list, which includes all universally web-safe fonts. |
| Font Size | Specifies the size of the text in points. |
| Font Color | Specifies the color of the text. |
| Formatting Options | Each button toggles a text styling option -- Bold, Italic, and Underline in that order. |
| Use Drop-Shadow | If enabled, a drop shadow will be added to the text. The color of the shadow is controlled by the color picker directly below the checkbox. |
| Drop-Shadow Color | If the Use Drop-shadow option is enabled, this settings specifies the color of the shadow. The default value is black (#000000). |
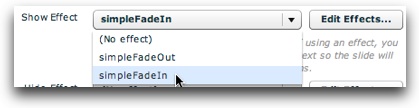
| Show Effect | Specifies the effect used when the text is initially shown. If you specify a show-effect, you likely need to set a small show-delay so that the slide will be fully visible prior to the effect beginning. Failing to do so can make the effect not ever show. To select an effect, you must have already defined an effect using the Effect Editor, which can be accessed by clicking the 'Edit Effects...' button. To learn more about creating effects, see the Using the Effect Editor topic. After effects have been defined, you can select from them using the dropdown menu:
|
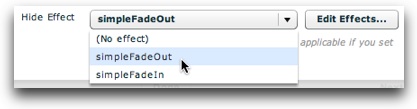
| Hide Effect | Specifies the effect used when the text is hidden, if a specific visible-time value has been set. If a negative visible-time value has been specified (indicating that the text never will be automatically hidden), then this parameter becomes irrelevant. To select an effect, you must have already defined an effect using the Effect Editor, which can be accessed by clicking the 'Edit Effects...' button. To learn more about creating effects, see the Using the Effect Editor topic. After effects have been defined, you can select from them using the dropdown menu:
|
When you're finished making changes in the Overlay Text Settings Editor, click the OK button to save your changes and return to the main dialog, or click Cancel to discard your changes:

Timing Examples:
Suppose you added two overlay text boxes to your image - "Important Message 1" and "Important Message 2". If you wanted Important Message 1 to appear for a couple of seconds then disappear, then have Important Message 2 appear for a couple of seconds and disappear, you might use the following timing values:
Important Message 1: Show-delay = 1 sec; Visible-time = 4 sec.
Important Message 2: Show-delay = 6 sec; Visible-time = 4 sec.
To remove a textbox, you must first select the row. To do this, click just to the left of the 'Y' position box. You can then click the '- Remove Selected Item' button:

This section is for advanced users or developers.
All overlay text instances are instances of the mx.controls.Text component. As such, the <text ... /> nodes in the <img> nodes which define the overlay text-boxes are actually Text instances. They support most of the attributes available for the Text component; see the class reference for available parameters.