 Download Help PDF (29MB) | Search:
One of the most powerful applications of dynamic data is creating your own data sources. This section gives an overview of this process and includes some example code for common applications.
Creating your own dynamic data source files requires two things:
Included with the extension are several dynamic-data-source starter files, which provide a starting point for PHP, ASP, and Coldfusion data sources. To access these templates, open the New Document dialog (File > New...), and select the Page From Sample > XML Flash Slideshow v4 folder. The appearance of the dialog will vary slightly in older versions of Dreamweaver, but will be similar:
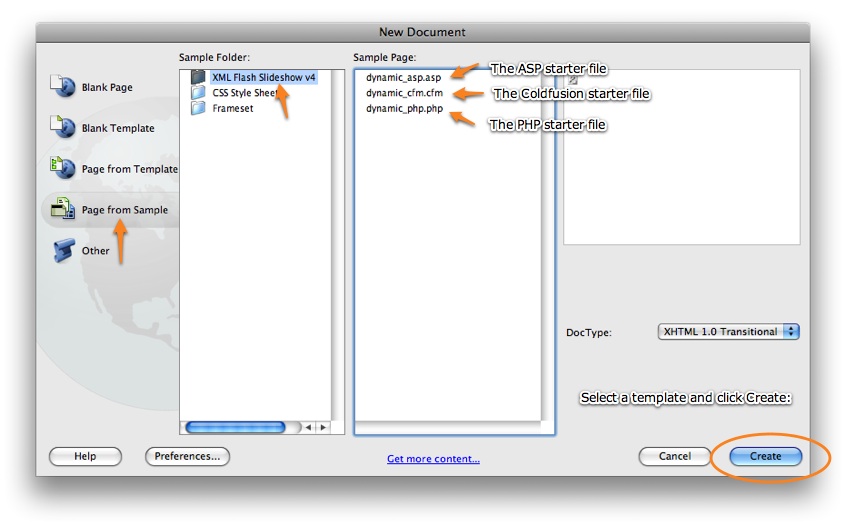
The dynamic_asp.asp file is for ASP, dynamic_cfm.cfm for Coldfusion, and dynamic_php.php for PHP implementations.
Important: Please note that these templates are for dynamic data sources, and are NOT pages into which slideshows should be inserted! Slideshows must be added to standard HTML documents as shown in earlier portions of the manual.
Once you click Create, you may receive the following prompt:
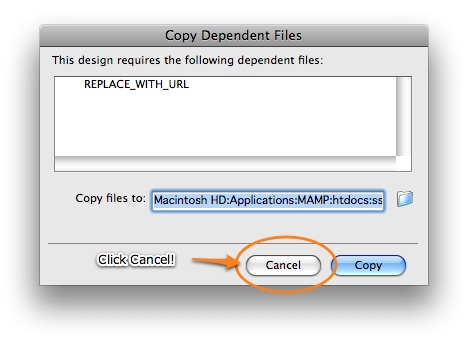
This is due to Dreamweaver thinking that the example code is requesting a dependent file to be copied. This is incorrect, and so Cancel should be clicked.
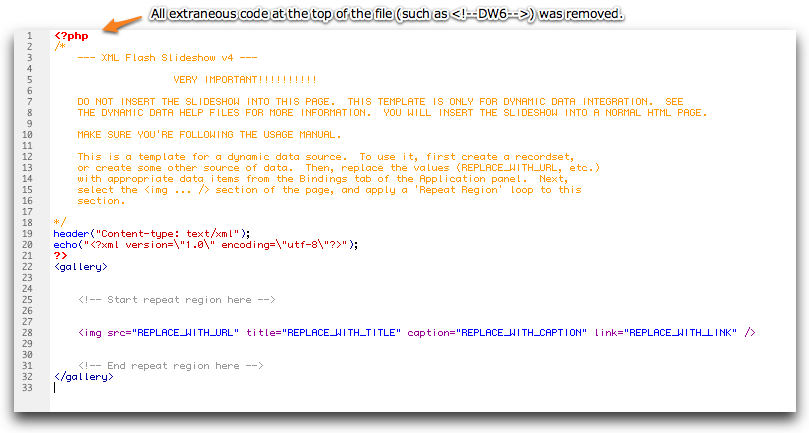
After creating the new document, switch to Code View. Sometimes Dreamweaver will add extraneous code at the top of the file, such as <!-- DW6 --> . This code must be removed, so that there is no code prior to the opening server-side code block (e.g. <?php ...).
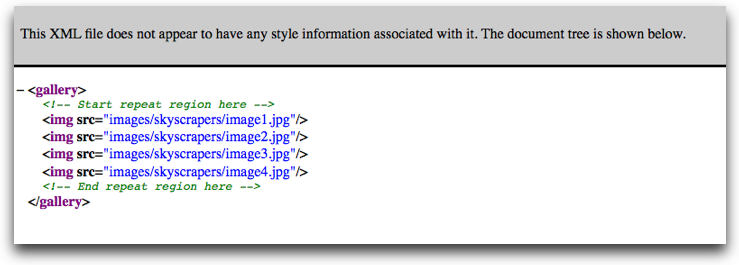
If you're using PHP, the blank template file should look like this:
Save the document in your site. It is usually best to save it in the same folder as the HTML page holding your slideshow (to simplify path creation).
The file can use either the Single Gallery Format (shown in this tutorial) or the Multiple Galleries Format (requires more advanced programming not covered in this tutorial). Both of these formats are described in the Supported Dynamic Data Formats topic, with the Single Gallery Format detailed further in the Developer Reference.
When your file is finished, you should be able to preview the file in a browser, and see a properly-formed XML document. The format of this XML is very important, to ensure that the XML can be properly read by your slideshow. The end result must be in the following format:
<gallery>
<img src="images/image1.jpg" title="Image 1 title" caption="" link="" />
<img src="images/image2.jpg" title="Image 2 title" caption="" link="" />
<img src="images/image3.jpg" title="Image 3 title" caption="" link="" />
</gallery>
There is a <gallery> node which holds multiple <img /> nodes. Each <img /> node represents a single
image. Each attribute specifies the following:
Now that you have your blank template, you're ready to bring it to life with some dynamic data. Do do this, you must start with a dynamic list of images. This can come from many different sources, including a database recordset (most common), an array of files in a directory, or a static list of images that you have randomized. More details about these different sources will be mentioned later on.
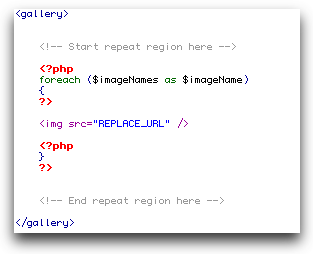
To translate this list into the proper XML format, you must create a loop in the dynamic data document. This loop will go over the list of images, outputting an <img src="..." /> node for each of these items.
The appropriate locations for the beginning and end of this loop are denoted by <!--Start repeat region here--> and <!--End repeat region here--> in the dynamic data file template.
Important note about image paths: Regardless of where the dynamic data source file is located, the image paths must be relative to the HTML page holding the slideshow. Failure to do this will result in 'Image failed to load' messages.
In the following sections of this topic, there are specific examples (with code) of various ways to get and use a list of images:
In this example, integration of image data from a database will be shown. While this example is shown for PHP, the techniques are fully applicable to other server languages as well.
First, you must use the Application panel to insert a recordset into the file. If you are not familiar with creating a Database connection and a Recordset, you will need to first familiarize yourself with basic Dreamweaver dynamic data concepts. To learn about this type of Dreamweaver development, see these pages in the Dreamweaver docs: Preparing to Build Dynamic Sites and Making Pages Dynamic.
Make sure that the recordset code doesn't include any linebreaks or other whitespace between code blocks. For example:

Must be changed to (by removing the linebreak):
![]()
Now, switch to the Bindings section of the Application panel (this example shown in Dreamweaver CS3; other versions are similar). Expand the recordset so that you can see each of the recordset fields:
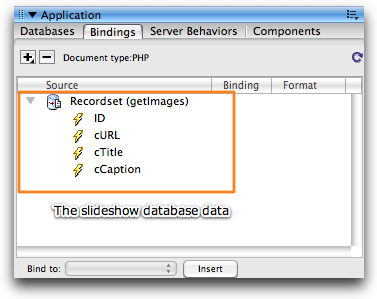
In this example, the recordset has been named getImages. The database table has three relevant columns: cURL (the URL to the image file to be used), cTitle (the title associated with the image), and cCaption (the caption/description associated with the image). In the document's code, locate the <img ... /> line (which represents the image), and select the src attribute:
![]()
Back in the Bindings panel, select the recordset field which represents the image URL (cURL in this example), and drag it onto the REPLACE_WITH_URL selection. It should replace the current contents, leaving you with something like this:

If you want to use a title, caption, link, or thumbnail from the database, replace the other attributes with data from the Bindings panel. If you don't plan to use the other attributes, simply remove them.
The <img ... /> section of your document should now look like this:
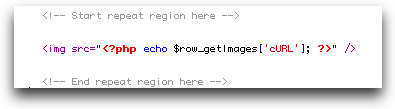
Note: If your title or caption values contain special characters (e.g. a quote or ampersand), you need to modify the PHP code to include the htmlspecialchars function. For example, you might have: <?php echo( htmlspecialchars($row_getImages['cCaption']) ); ?>
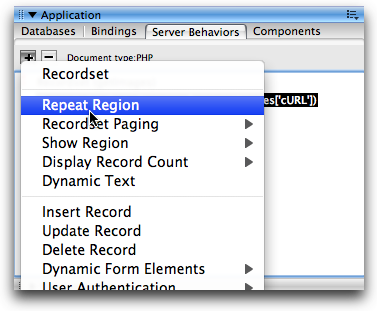
You are now ready to setup the looping for the <img ... /> node. Select the entire <img ... /> line, and switch to the Server Behaviors section of the Application Panel. From the add behavior menu, select the Repeat Region option:
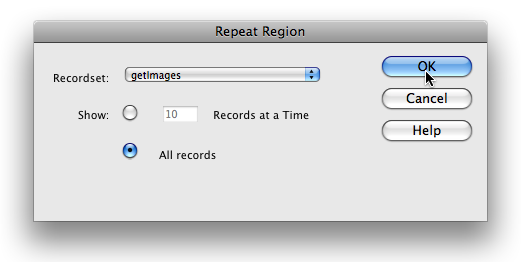
In the Repeat Region dialog, select the images recordset (getImages in this example), select the 'All Records' option, and click OK:
The repeater code will be added to your document. The <img ... /> portion should now look similar to this:
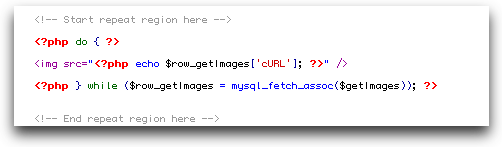
This loop will output an <img ... /> node for each record in the database recordset. You are now ready to preview the file in a browser and verify that everything is properly configured. Upload the page if necessary, then open it in a browser. Firefox is recommended because of its superior XML viewing tools. You should see something like this:
As intended, this is a dynamically-generated list of images pulled from the database. If you instead see a PHP error about 'Output already started at line N...', then make sure that you have no whitespace or other extraneous code before the very first <?php code block. Additionally, make sure that there aren't any linebreaks or other whitespace characters between the first couple of <?php ... ?> blocks.
Once everything appears correctly, the dynamic data file is ready to be added in the wizard as a source of external image data.
To use all images in a directory, you first need to get the list of all images. To begin, add the following PHP code block directly above the <gallery> node in the blank file:
To work properly, you must update these two lines to point to the images directory:
// Specify the path to the images directory on the server, **relative to this file**
$dir = "images/skyscrapers/";
// Specify the path to the images directory, **relative to the slideshow's HTML page**
$relativePathTo = "images/skyscrapers/";
As stated in the comments, the first reference must be relative to the data source file and the second relative to the slideshow's HTML page. In this instance, this is the same because the data source file is in the same directory as the slideshow's HTML page. The code will get all of the jpeg images in the directory and place them in the $imageNames array.
Next, looping code must be added. Above the <img ... /> node, add the following:
<?php
foreach ($imageNames as $imageName)
{
?>
Directly below the <img ... /> node, add this:
<?php
}
?>
Your code should now look like this:
Now that the loop is set up, replace the REPLACE_WITH_URL text with the following code:
<?php echo($relativePathTo . $imageName); ?>
Your <img ... /> line should now look like this:
![]()
You can now preview the file in your browser. As mentioned in the recordset example, Firefox is recommended. You should see something similar to this assuming you have defined the directory paths correctly:
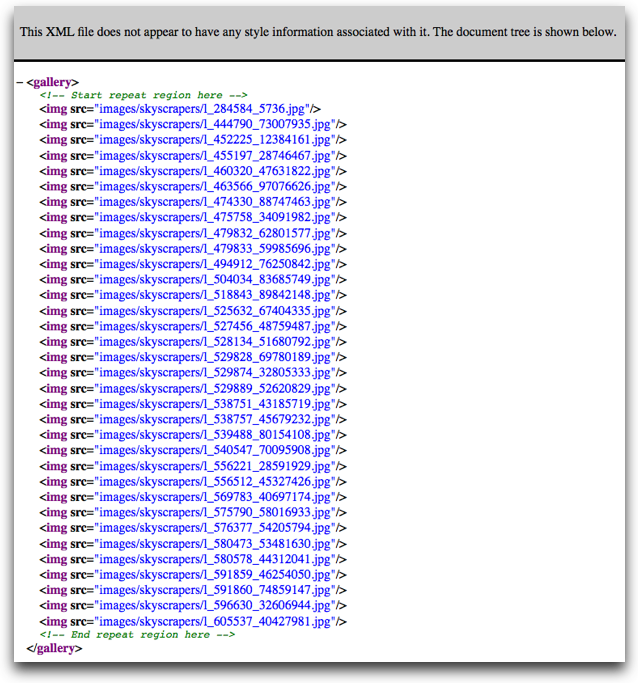
As intended, the list of all files in the directory has been outputted. If you add or remove files then reload the page, only the currently-present images will be listed.
If you instead see a PHP error about 'Output already started at line N...', then make sure that you have no whitespace or other extraneous code before the very first <?php code block. Additionally, make sure that there aren't any linebreaks or other whitespace characters between the first couple of <?php ... ?> blocks.
Once everything appears correctly, the dynamic data file is ready to be added in the wizard as a source of external image data.